
Documentation
Boring Funnels: user guide
Boring Funnels adds a focused checkout, order bumps and (in Pro) one-click upsells to a WooCommerce store. It does not replace your checkout page or your payment gateways. It gives WooCommerce’s own checkout a cleaner frame, puts your offers in the right places and reports what they earned.
This guide covers the free plugin and the Pro add-on. Screenshots come from a demo store selling an online course.
Contents
- Before you start
- Install and activate
- Your first funnel in four steps
- The funnel checkout link
- Order bumps
- Checkout fields
- Thank-you content
- Using a funnel for the store checkout
- Branding and settings
- Statistics and the steps report
- Pro: one-click upsells and downsells
- Pro: bump rules
- Payment gateways
- Frequently asked questions
Before you start
You need:
- WordPress 6.5 or newer and WooCommerce 9.0 or newer.
- PHP 8.0 or newer.
- Pretty permalinks enabled (Settings > Permalinks, anything other than „Plain”). Funnel links use the
/go/path. - At least one purchasable product.
The free plugin gives you two active funnels and one order bump. Pro removes both limits and adds upsells, downsells and bump rules.
Install and activate
- In WordPress go to Plugins > Add New, search for „Boring Funnels” and click Install, then Activate. You can also upload the zip file from Plugins > Add New > Upload Plugin.
- A new „Funnels” menu appears in the sidebar. Open Funnels > Dashboard.
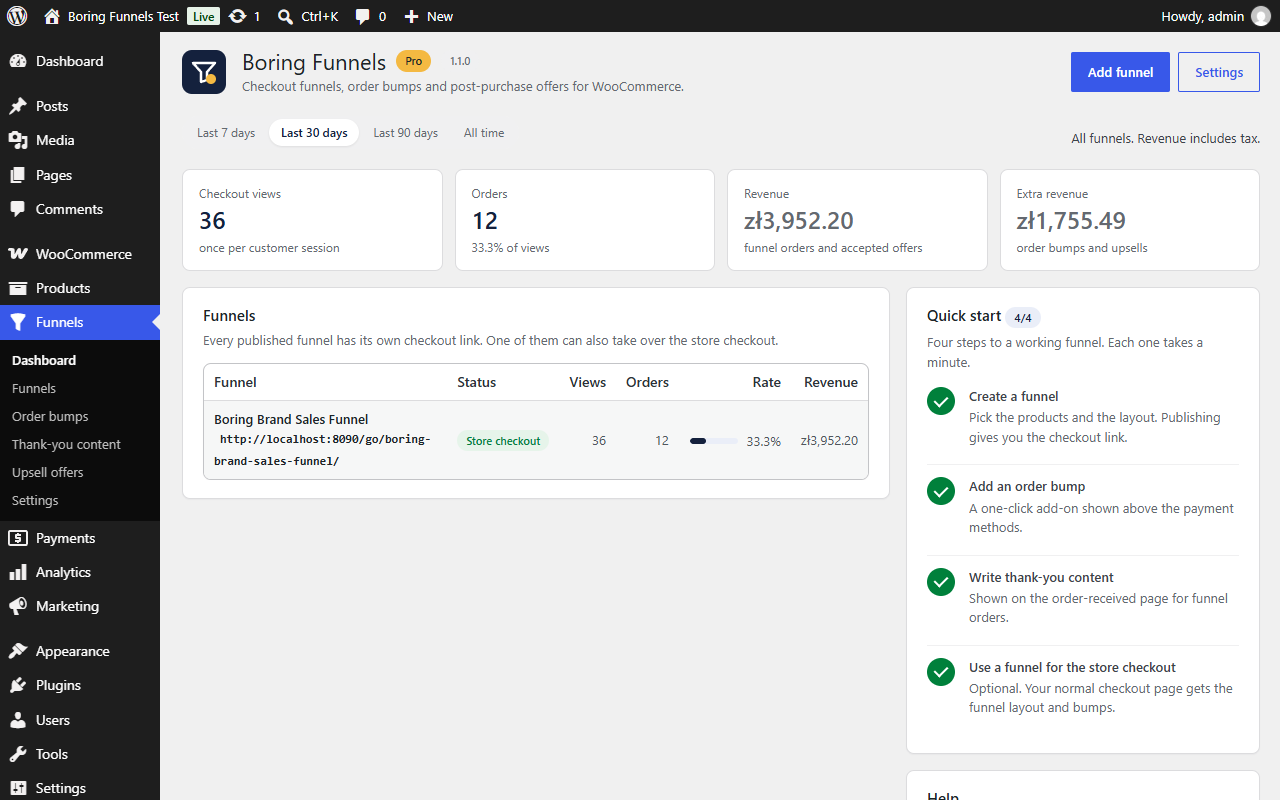
The dashboard shows four numbers for the selected period (checkout views, orders, revenue and extra revenue from bumps and upsells), a table of your funnels and a quick start checklist on the right. The checklist ticks itself as you complete the steps.
Pro: upload and activate „Boring Funnels Pro” the same way. It needs the free plugin to stay active. Enter your licence key when asked (Funnels > License).
Your first funnel in four steps
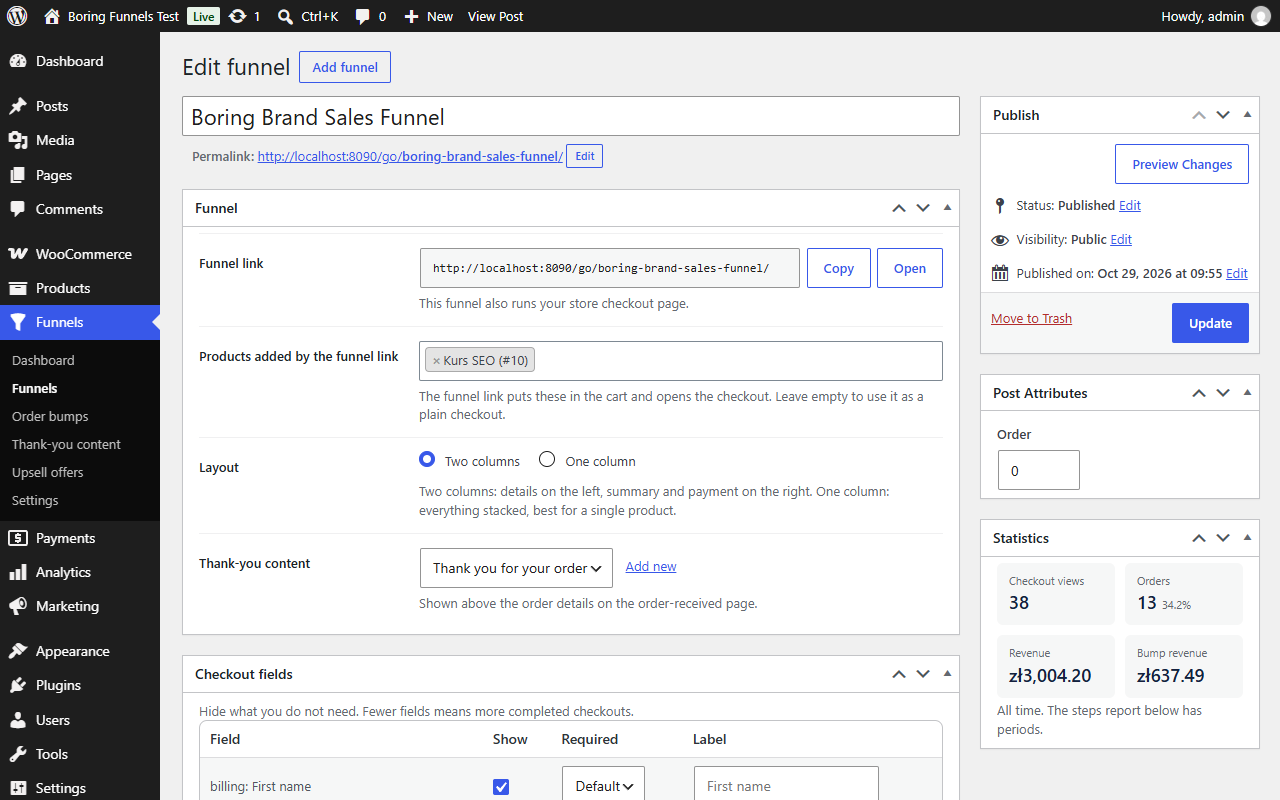
Step 1. Create a funnel. Go to Funnels > Funnels > Add funnel. Give it a name (customers do not see it) and in the Funnel box pick the products the funnel link should put in the cart. Choose a layout: two columns for most stores, one column for a single digital product. Click Publish.
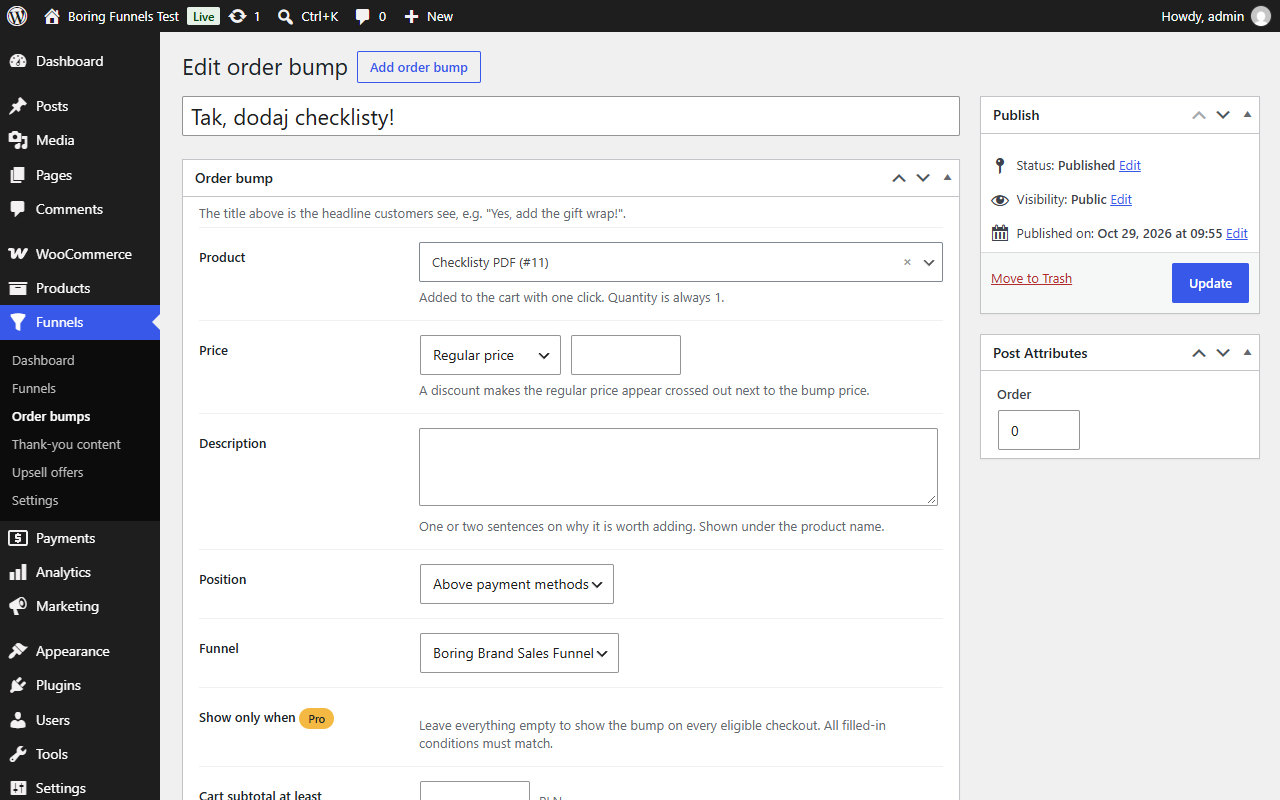
Step 2. Add an order bump. Go to Funnels > Order bumps > Add order bump. The title is the headline customers see, for example „Yes, add the checklists!”. Pick the product, set a price (regular, percent off or a fixed price), write one or two sentences and choose where it appears. Publish.
Step 3. Write thank-you content. Go to Funnels > Thank-you content > Add. Write what the customer should read right after paying (next steps, a video, a support address). Publish, then select it in the funnel editor under „Thank-you content” and update the funnel.
Step 4. Share the link. Open the funnel again. The Funnel link box at the top has a Copy button. Use the link in ads, emails and buttons. Customers land straight in the checkout with the products already in the cart.
The funnel checkout link
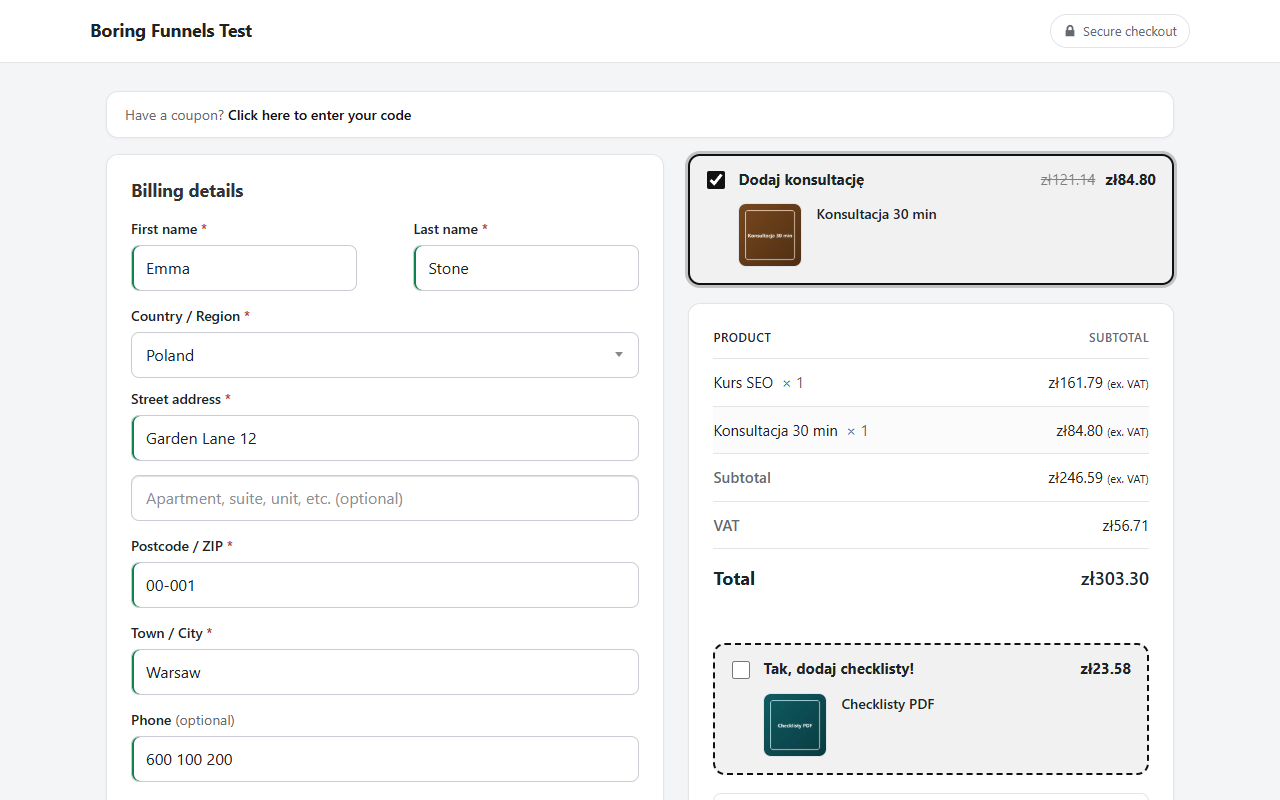
Every published funnel has an address like https://yourstore.com/go/spring-course/. Opening it:
- Empties the visitor’s cart and adds the funnel products (once per visit; add
?bf-reset=1to the link to force a fresh cart). - Opens the checkout in the funnel layout, with the funnel’s bumps and fields.
- Marks the resulting order as a funnel order, so it shows in the statistics and gets the thank-you content.
If the product list is empty, the link works as a plain checkout for whatever is already in the cart. That is handy for a campaign-specific checkout without changing the products.
A draft funnel, or a funnel above the plan limit, redirects to the normal checkout.
Order bumps
An order bump is a one-click add-on shown inside the checkout. The customer ticks a box and the product is added to the order at the bump price, quantity one.
Settings in the bump editor:
- Product: a simple product or a variation.
- Price: regular price, a percentage off, or a fixed price. With a discount the regular price shows crossed out.
- Description: shown under the product name, next to the product image.
- Position: above the payment methods (recommended) or above the order summary.
- Funnel: all funnels, or one funnel only.
A bump is hidden when the same product is already in the cart as a regular item. The free plugin activates the first published bump; Pro activates all of them and adds rules (see section 12).
Checkout fields
In the funnel editor, the Checkout fields box lists the billing, shipping and order fields. For each one you can:
- untick Show to hide it,
- set Required to Yes or No (Default keeps the WooCommerce rule),
- give it a different label.
Email is always shown and required. Fields you do not touch keep their WooCommerce behaviour, so address validation and shipping calculations keep working. Hide what your product does not need: a digital product rarely needs a street address.
Thank-you content
Thank-you content is a normal block editor page shown at the top of WooCommerce’s own order-received page, only for orders that came through a funnel. Because the order-received page itself is untouched, every payment gateway, invoice plugin and tracking script keeps working.
Good uses: how to access the product, a short welcome video, what happens next, a support contact. Scripts, iframes and forms are stripped for safety; embed videos with the YouTube or Vimeo block instead.
Using a funnel for the store checkout
By default funnels live on their own links and your regular checkout page stays as it is. If you want every checkout to use the funnel layout, go to Funnels > Settings and pick a funnel under „Store checkout funnel”. That funnel’s layout, fields and bumps then apply to /checkout/ as well. Only one funnel can be the store checkout.
The Checkout block (Gutenberg) is replaced by WooCommerce’s classic form inside the funnel template, so bumps and field settings work. Switch the setting back to „None” to restore the block.
Branding and settings
Funnels > Settings has three cards.
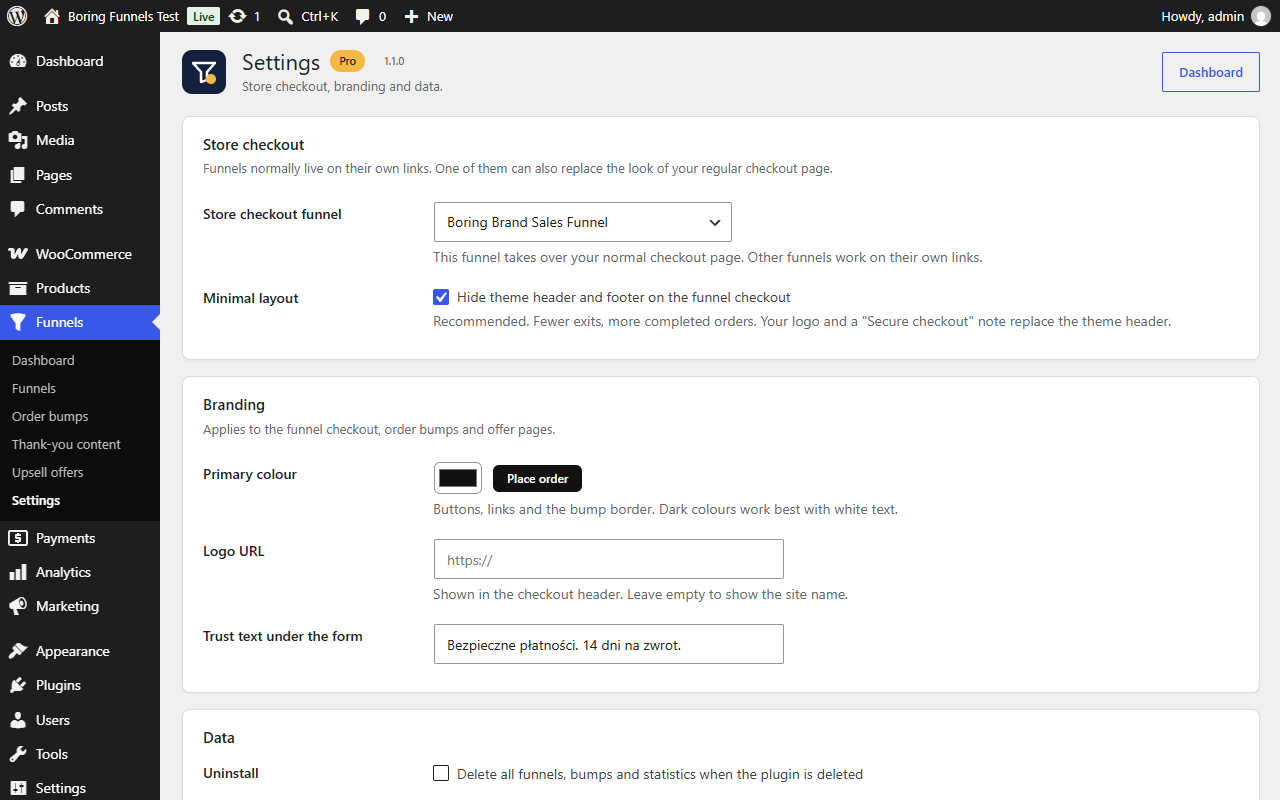
- Store checkout: the store checkout funnel and the minimal layout switch. The minimal layout hides your theme header and footer on funnel checkouts and shows your logo with a „Secure checkout” note instead. Fewer exits, more completed orders.
- Branding: the primary colour (buttons, focus rings, bump border), a logo URL and a trust line under the form, for example „Secure payment. 14-day returns.”.
- Data: whether to delete funnels, bumps and statistics when the plugin is deleted.
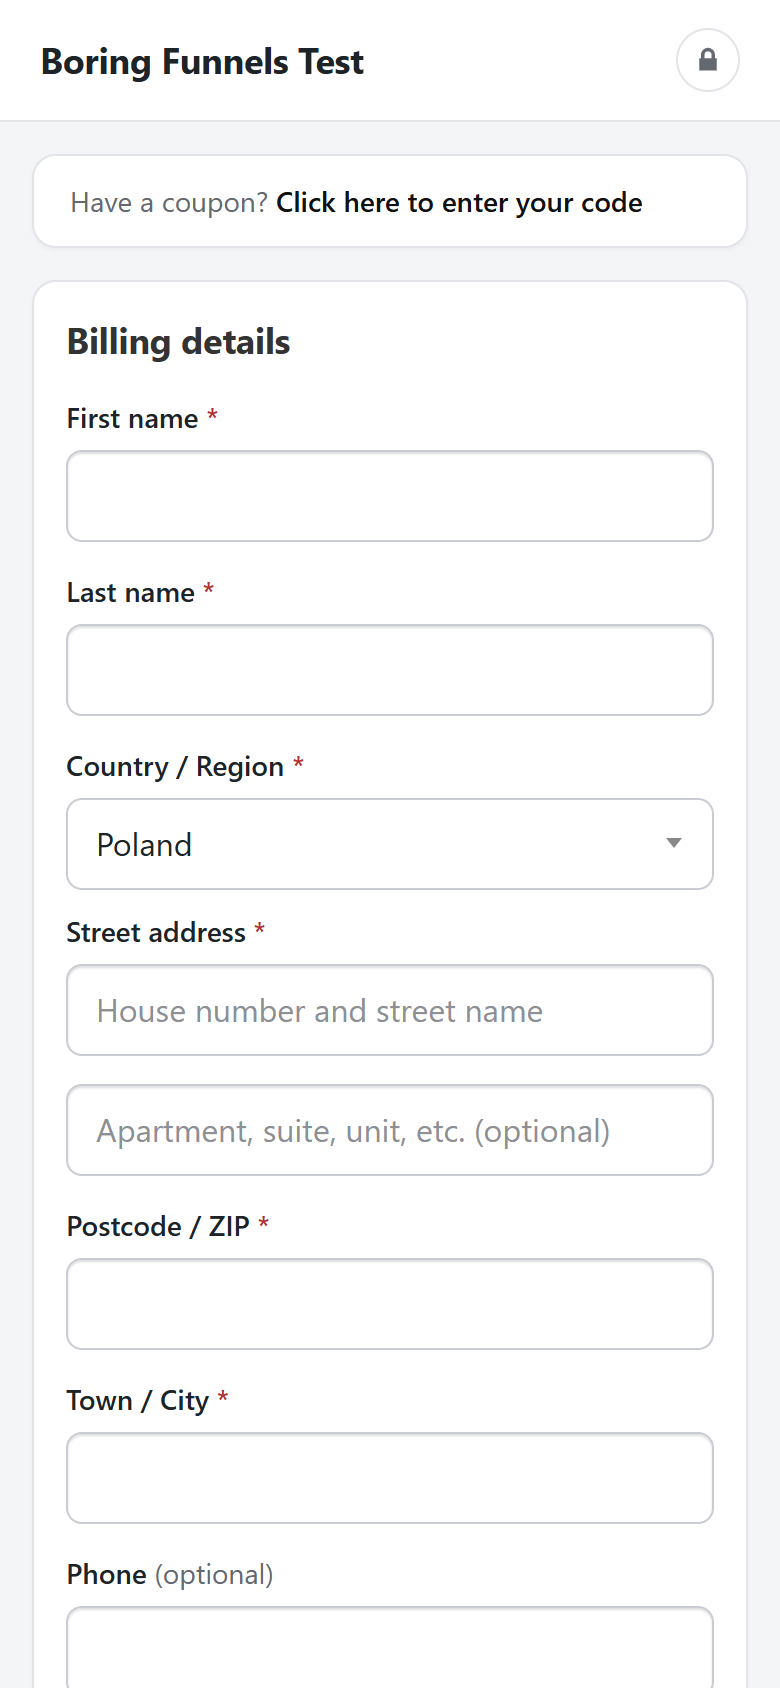
The checkout works on phones out of the box.
Statistics and the steps report
Views are counted once per customer session, orders when they are paid or put on hold, revenue including tax.
- Dashboard: totals for all funnels for the last 7, 30 or 90 days or all time, plus a per-funnel table with conversion rate.
- Funnel editor, Statistics box: all-time numbers for this funnel.
- Funnel editor, Steps report: one row per step (checkout, each bump, each Pro offer) with views, conversions, rate and revenue, with the same period filter.
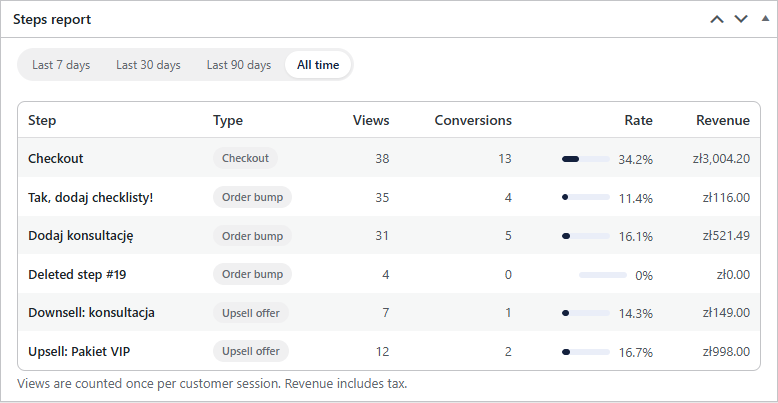
A deleted bump or offer stays in the report as „Deleted step” so history adds up.
Pro: one-click upsells and downsells
After a successful payment, Pro can show up to five offers one after another. Each offer is a separate page with the product, a price and two buttons: Yes and No thanks.
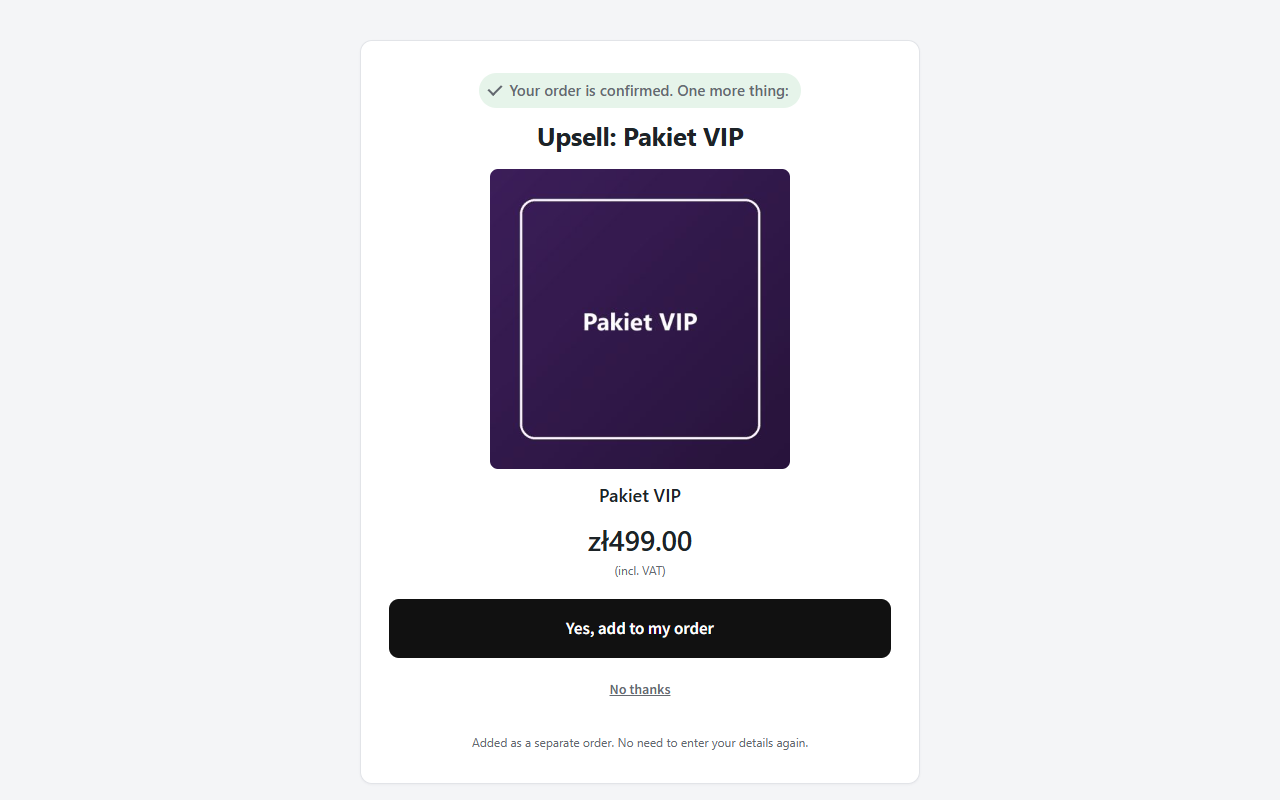
Create an offer: Funnels > Upsell offers > Add offer. The title is the page headline. Pick the product, set the price, write a short description and, if you want, custom button labels. „If declined, show this offer” turns another offer into a downsell: a cheaper alternative shown once, only to customers who said no.
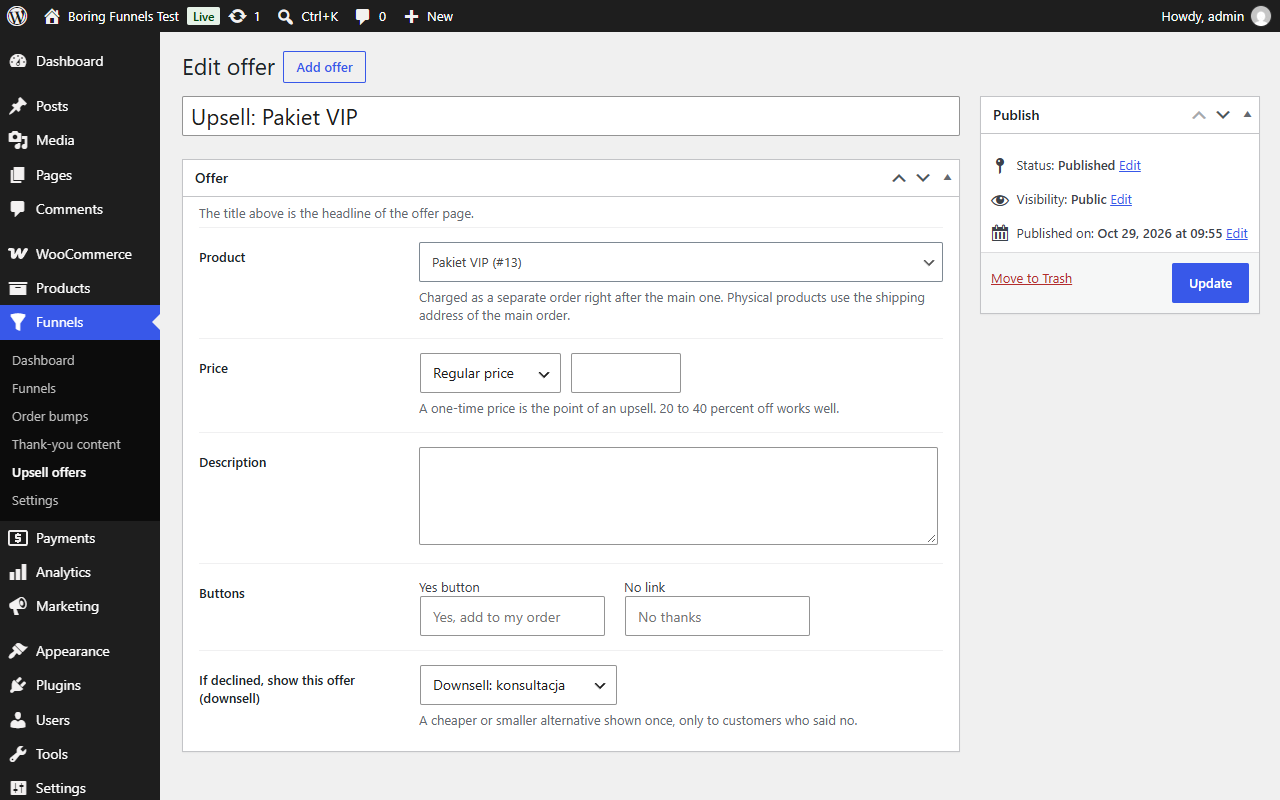
Attach offers to a funnel: in the funnel editor, the Upsell sequence box lists five slots. Pick an offer per slot and update the funnel.
How the charge works: saying Yes creates a separate child order linked to the main order. Your accounting, invoices and refunds work per order and the paid main order is never modified.
- Card payments through Stripe with a saved card are charged in one click.
- Other gateways (Przelewy24, PayU, BLIK, PayPal, bank transfer) send the customer to the payment page for the new order with the same method preselected. BLIK means one new code.
- If the product is out of stock the offer is skipped. Refreshing the page or going back never creates a second child order.
Pro: bump rules
With Pro the bump editor gets a „Show only when” section:
- cart subtotal at least a given amount,
- cart contains any of the selected products,
- cart contains a product from the selected categories.
Leave everything empty to show the bump on every eligible checkout. All filled-in conditions must match. Rules are re-evaluated when the cart changes during checkout.
Payment gateways
The funnel checkout is WooCommerce’s classic checkout form inside a different template, so gateways do not need adapters. Tested in the development environment with bank transfer, cheque and cash on delivery, with and without High-Performance Order Storage. For Stripe one-click upsells the Stripe plugin must be allowed to save cards; the customer’s first payment stores the card. Gateways with redirects return to the order-received page as usual and the offer appears after they return.
Frequently asked questions
Does it work with the Checkout block? Yes. The funnel template renders the classic form, your block checkout stays untouched for non-funnel checkouts.
Will it slow down my store? No. One small stylesheet and one script load only on funnel checkouts. Nothing loads elsewhere.
Can I style the checkout myself? Yes. Copy templates/checkout.php, templates/bump.php or Pro’s templates/offer.php into yourtheme/boring-funnels/ and edit. The primary colour is a CSS variable, --bf-primary.
Where are the hooks? docs/hooks.md in the plugin repository lists every action and filter.
I reached the limit in the free plugin. Only the first two published funnels and the first bump are active. Unpublish the ones you do not need or upgrade to Pro.
Something looks off with my theme. Enable the minimal layout in Settings. If a field looks wrong, tell us the theme name through the support form at boringdev.pl.
Need help? Contact support. Back to Boring Funnels.